PROJECT JAPANESE GEISHA THEMED BAG
Spirit of Japan
by Pauline Fisher
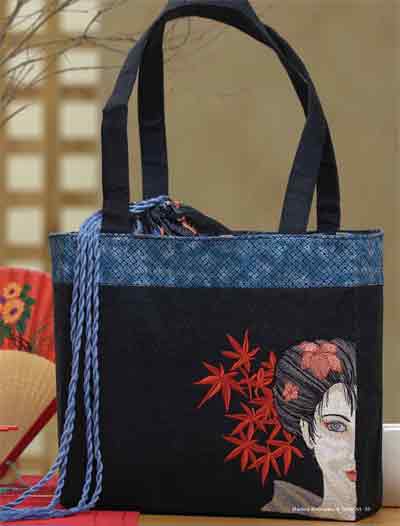 When Pauline saw this lovely new set of machine embroidery designs from Orfeus with a Japanese Geisha theme (Digitizer Igor Denisov) she immediately envisioned how they could be used to embellish a beautiful bag. I’m sure you will agree - the result is stunning!
|
MATERIALS |
|
• 1m x 115cm (1yd x 45in) wide fabric for outer bag, handles and internal pockets in tone-on-tone or an unobtrusive print
• 60cm x 115cm (24in x 45in) wide fabric for drawstring top and lining in Japanese theme print
• 25cm x 115cm (10in x 45in) wide contrast print for upper bag band in a small geometric print that ties fabrics together
• Geisha from Denisov Embroidery Studio Designs - see end of article for ordering details
• Construction thread to match fabrics
• Embroidery threads in your choice of colours
• 80cm (311/2in) craft fuse - a heavy and stiff iron-on interfacing
• 40cm (16in) iron-on pellon
• DMC Cebelia cotton to make twisted cords and tassel
• Dressmaking chalk, marker or removable type
• Heavy-weight cut-away stabiliser
• Fabric or spray glue
NOTE: Your embroidery machine will need a hoop capability of 115mm x 225mm (41/2in x 9in) for this project. |
|
|
TIPS:
– Use good quality fabrics!
– Don’t substitute a light-weight interfacing – even ironing two layers will not give the stiffness you need. Remember that a bag is only as good as its interfacings.
– Take your time. Read all instructions through before commencing and press at every stage, then press again. By pressing I mean placing the iron down fl at and holding in place with pressure before lifting it up and moving it to another spot.
– To achieve accurate design placement, print a template of the geisha. Use a rotary cutter, mat and ruler for accuracy in cutting fabrics.
CUTTING
From the main fabric cut:
– Two, 10cm (4in) wide strips across the width of the fabric. These are for the straps and can be trimmed to 65cm (251/2in) or your preferred length.
– One, 33cm (13in) wide strip across the width of the fabric. Cross-cut two pieces measuring 42cm x 33cm (161/2in x 13in)
– One, 33 cm x 74cm (13in x 291/4in) piece for the pockets. This will be cut in two pieces measuring 30cm (113/4in) after the application of craft fuse in the next step.
– Apply craft fuse to all the above pieces, press well and leave on a fl at surface to cool. For the pockets, cut craft fuse measuring 16.5cm x 33cm (61/2in x 13in) and apply to one half of each pocket.
From the contrast band fabric cut:
– One, 6cm x 64cm (21/4in x 251/4in) strip. Cross-cut two pieces measuring 6cm x 32cm (21/4in x 125/8in).
From the Japanese fabric cut:
– Two, 30cm x 40cm (113/4in x 153/4in) pieces for the drawstring top.
– Two, 40cm x 32cm (153/4in x 125/8in) pieces for the bag lining. Cut two pieces of iron-on pellon to the same size and press to the wrong side of the fabric. |
 |
CONSTRUCTION
NOTE: All seams are 5mm (1/4in) unless otherwise stated.
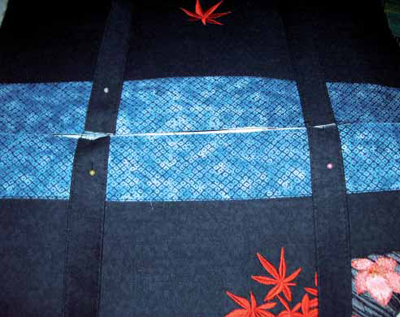
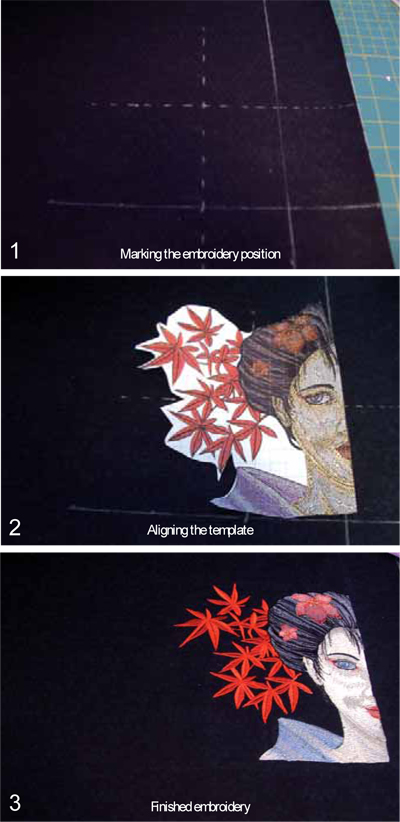
With the right side of the main bag fabric facing and positioned so the 42cm (161/2in) length is across the top and bottom, and the shorter measurement as the side edges, measure 7cm (23/4in) up from the lower edge. Mark this point on both side edges and then draw a line joining them with chalk or a fabric marker. On the right hand side of the fabric, mark another point 7cm (23/4in) in from the side edge on the top and bottom. Using a fabric marker, draw a line to join these two points. See photo 1.
Clearly mark the cross-hairs on the design template. Position the template so the side of the design and the lower edge sit on the previously marked lines. The side of the embroidery design (half face) will be along the edge that forms the side of the bag. The lower edge of the design will sit on the edge that will form the bag base. Draw a dashed line to mark the design centre lines using the template as a guide. See photo 2.
The template can be repositioned and pinned if desired.
Hoop the stabiliser. This design can be sewn with one hooping of a mega hoop or two of a 115mm x 225mm (6in x 10in) hoop. If your machine has a basting feature, stitch the design fi eld outline on the stabiliser to help with positioning the fabric. Using the basting lines and template markings, place the fabric on the stabiliser so the centre of the design matches the marked centre on the bag. Baste in place by gluing or pinning well outside the design area. Make sure the design orientation is correct before commencing embroidery. This fabric is fairly stiff so manipulate it under the foot carefully. As the design is stitch intensive, the craft fuse interfacing helps to keep the fabric from puckering.
Stitch the design in your chosen colours. Metallic thread can be used for highlighting the geisha’s eyes, robe and fl ower centres. See photo 3.
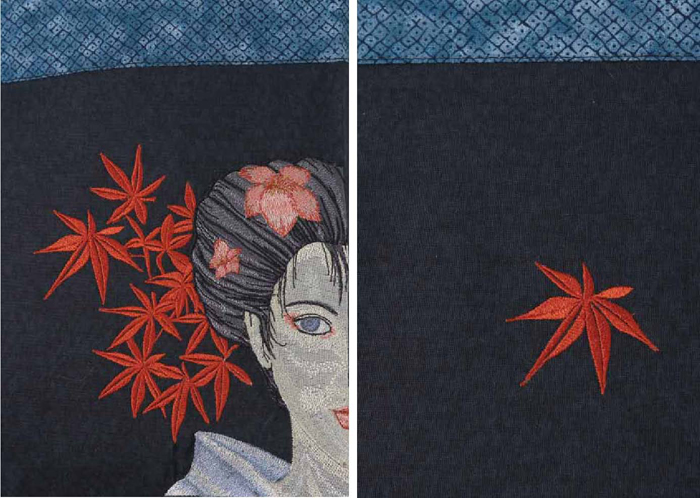
If a 115mm x 225mm (6in x 10in) hoop has been used, a second hooping will be required to stitch the large leaf. Use a template of the leaf and mark the centre of the design. Hoop up stabiliser and stitch the leaf to complete the design. If your machine has a positioning feature, use this for accurate placement. I repeated the leaf design on the centre back of the bag as it’s signifi cant in Japanese culture to have a small design on the back, especially on clothing – this is for good luck or protection. Mark the centre of the back fabric with chalk and follow the directions as for the geisha placement. After the embroideries are fi nished, cut the stabiliser from around the designs. Press well and leave to cool. Trim the completed pieces to 40cm x 32 cm (153/4in x 125/8in) with the geisha’s face placed 5.5cm (21/4in) from the side and lower edges.
CONTRAST BAND
Measure 6.5 cm (25/8in) down from the top edge of the front and back pieces. Mark this point on each side, then draw a line across the fabric on the right side. Draw a line 5mm (1/4in) along one long edge of each piece, on the wrong side. Match these lines with the right sides of the fabric together and stitch along the marked line on the contrast fabric. Press the contrast fabric up over the stitching. The top edges will be even. Topstitch the lower edge, close to the folded edge, in a contrast thread.
STRAPS
Press each strap in half along the length and open out. Fold the outer edge to the centre and press. Repeat for the other side of the strap. Fold in half again to enclose the raw edges. Stitch close to the edge down both sides of the strap, then repeat for other one. You may need to use a jeans needle to sew through the thickness of the folded straps. Along the top edge of the bag, measure 10cm (4in) in from each side edge on the front and back bag pieces. Pin the straps in position and baste using a scant 5mm (1/4in) seam. To ensure the straps line up perfectly, lay the front and back bag pieces on a fl at surface with the top edges opposing. Move the straps as necessary so they line up perfectly – make sure they’re not twisted. See photo 4.
POCKETS
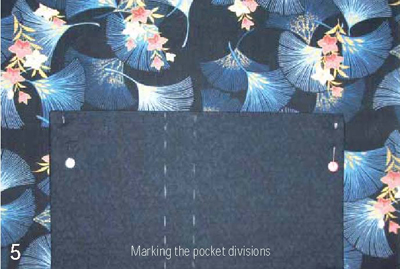
Take the pocket pieces that have craft fuse pressed to them and fold in half with right sides together. Stitch down each side. Clip the corners, turn right side out and press. Repeat for other the pocket. Measure 6cm (21/4in) up from the bottom edge of the lining and place the raw edge of the pocket along this line. Stitch 5mm (1/4in) in from the raw edge of the pocket and through all thicknesses. Press the pocket up into the body of the bag lining, over the seam. Using a chalk marker, draw lines on the pocket where divisions are desired. See photo 5.
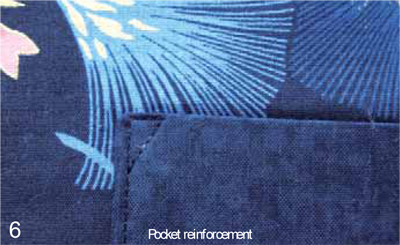 This step can be omitted if no pocket divisions are required. Stitch along these lines, through all thicknesses and close to the side and lower edge of the pocket to form a triangle at the upper edge to keep the pocket from gaping. See photo 6. Repeat for other the pocket, then press thoroughly.
 DRAWSTRING CLOSURE
Base formation Take both upper bag pieces and make two 1cm (1/2in) buttonholes on the right side, of both sides. Place them 3cm (11/4in) down from the raw edge and 1cm (1/2in) in from the side edge – four in total. With right sides together sew these two pieces, with buttonholes matching, along the short edge. Neaten the raw edges of the seams. Press the top edge 1cm (1/2in) to the wrong side, fold again and press. The buttonholes should be in the casing showing on the right side of fabric.
BAG COMPLETION
Fold the front and back bag pieces along the side and bottom edges for 5.5cm (21/4in) and press. The geisha’s face should be right on the folded edge. Make sure a crisp fold is pressed into the fabric. 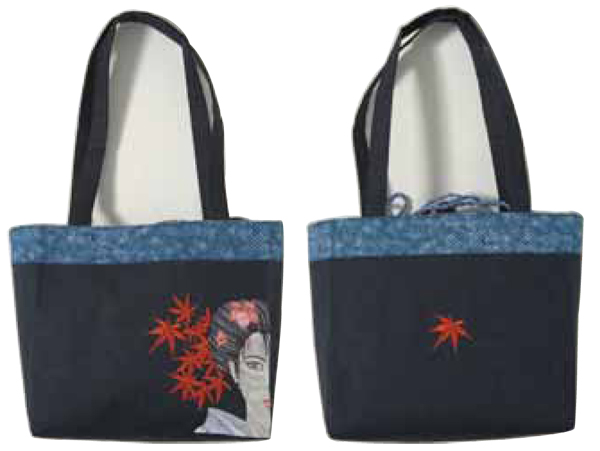 With the right sides of the outer bag together, stitch the side and bottom seams. Repeat for the lining, but leave a 10cm (4in) opening along the lower seam for turning. Bring the side and base seams together at the corners, making sure the seams run along each other. Pin to keep in place. A pointed corner will be formed. Work the geisha’s side of the bag fi rst. Draw a line from the folded edge, across the seam, to the other folded edge – this should measure approximately 5.5cm (21/4in) from the peak of the triangle that’s been formed. Making sure the design sits on the folded edges, stitch this line twice. Repeat for the other side of the bag making sure the same measurement is used. Repeat for the lining. Turn all pieces right side out and check the seams match perfectly. When happy with the corners, turn the lining inside out again and trim to 5mm (1/4in). I prefer not to trim the corners on the main bag as this gives it more stability in the corners. Press them down into the bag base. With the right side of the bag facing, match the right side of the drawstring piece to the upper edge of the bag, ensuring the raw edges are even on all pieces and side seams are matching. Stitch with 5mm (1/4in) seam. Sit the main bag in the lining, ensuring the straps and drawstring piece are sitting fl at. Pin, making sure all raw edges are even and side seams match. Sew in place – stitching over the straps twice. Gently pull the outer bag through the open seam in the lining. Press where the bag, drawstring top and lining are stitched together and make sure the corners are square with seams matching. Pin the upper edge so the lining and drawstring top sit down into the bag. Stitch close to this top edge through all thicknesses. The opening in the lining can be closed by hand or machine. Push the corners of the lining well into the outer bag. The lining should sit neatly in the bag and the pockets should sit slightly above the fold that forms the bag base.
TWISTED CORD
Cut 25, 2.5m lengths of DMC cotton. Knot close to one end and tape this to a fl at surface – I use my cutting table.
Twist the threads for at least 120 revolutions. Run your hands along the threads to even out the twists as you go. When the cords are well twisted, put both ends together and allow the threads to twist up on each other. Knot the ends together to stop it from unravelling. Thread this through the casing so the ends are entering and exiting the two buttonholes on the same side seam. Repeat this process to make a second cord. Thread the completed cord through the opposite buttonholes.
TASSELS
Cut a 50cm (193/4in) length of thread and wind it around the twisted cord, approximately 11cm (41/2in) from the knotted end. Make sure it wraps around several times and is tight. Thread a needle on the end of the thread and take it down under the wraps to secure. Cut the ends close to the knot. Repeat for other cord. Run a comb through the tassel to untangle it – a spray of water helps with kinks – then trim so the ends are even. Repeat for the other cord.
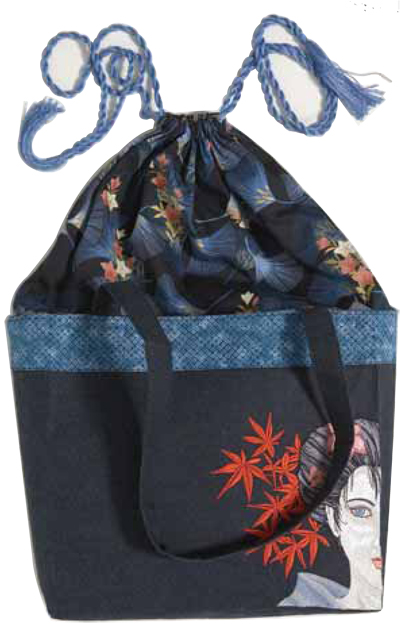
Give the bag another press and clip any stray threads. See photo 7.
Special thanks to Olga Sudnitsin (Australia Brisbane) CEO the company engaged in distribution Sonit Ind. this collection under the brand name Orfreus embroidery.
 Instant Download